 USA + International
 OWC Canda
 OWC Europe
Editing iPhone Cinematic Footage in Final Cut: A Preview of Cinematography's Future
Cinematic Mode footage shot with an iPhone Pro allows you to adjust focus and bokeh in post. It's early days, but this is clearly the future of cinematography.
Reuben Evans • Aug 07, 2023
Who isn’t tired of those videos on YouTube where they compare the latest iPhone to the most expensive cinema camera they can find? Most of the time, it is an apples-to-oranges comparison.
But in this case, the comparison is legitimate. An iPhone 14 Pro Max shooting in cinematic mode, combined with Final Cut Pro will allow you to change your focus and aperture in post.
Now that is something useful that no other camera/software combo can touch. Due to the lack of true computational photography power in even the most advanced cinema cameras, this type of capability is something that those professional cinema cameras can't replicate. This type of advancement in digital imaging might excite you or abhor you. But it's clear at this point that computational imaging is the future. As professionals, it's always best to be prepared for what's coming and take advantage of every tool available.
So, to try this combo, I had my daughter, Evangelina, take our dog on a walk to see how it works. Here's what I learned. Hopefully, you can find a place for this tool in your creative kit as I have in mine.
Hardware and settings
We’re using the iPhone 14 Pro Max (512GB). This phone gives us access to the high-quality ProRes codec.
The built-in camera app has “Cinematic” mode selected. The resolution is 4K, and the frame rate is 24p. No stabilizer, ND, or lens adapters are being used.
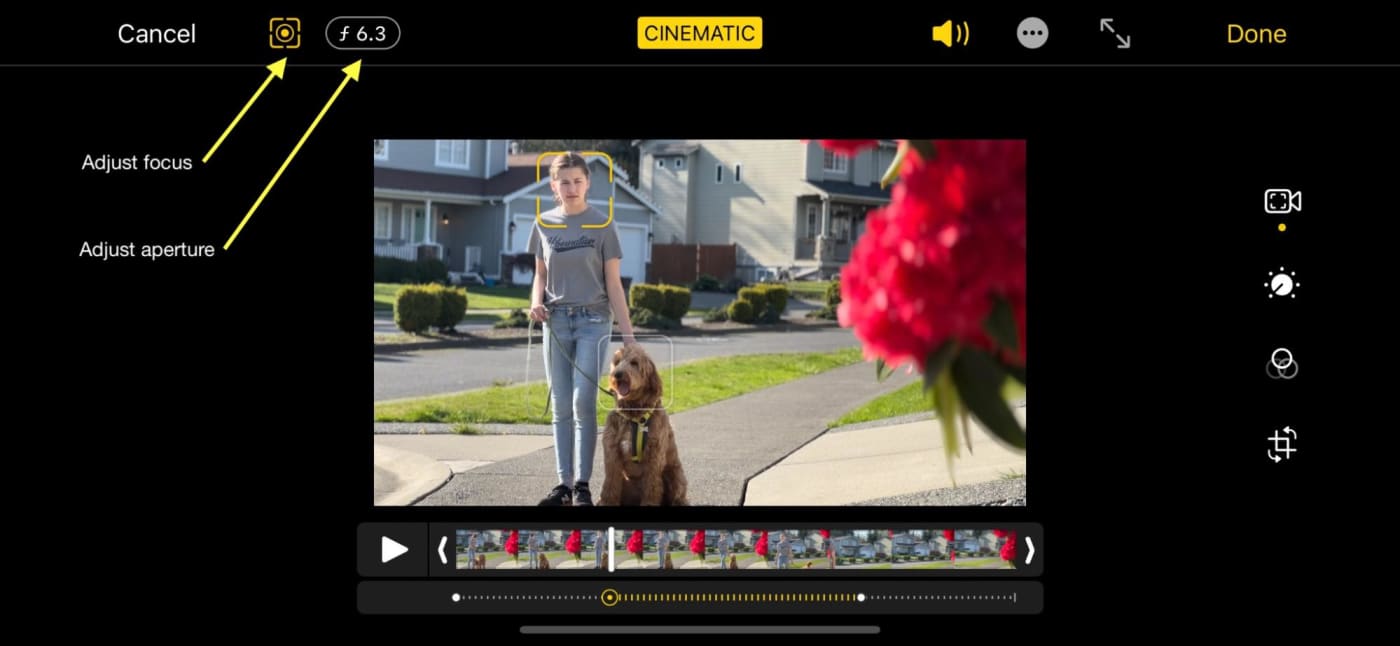
In the picture above, you see the “edit” mode. This mode allows you to adjust the focus and aperture after you have shot your clip. I picked this spot to see how it works on faces, animals, and foreground foliage.
Adjust focus
It is easy to adjust the spot where your iPhone is focused on in post. I just tapped on the flower, and now it is in focus. If I want to go back to another subject, it is just another tap.
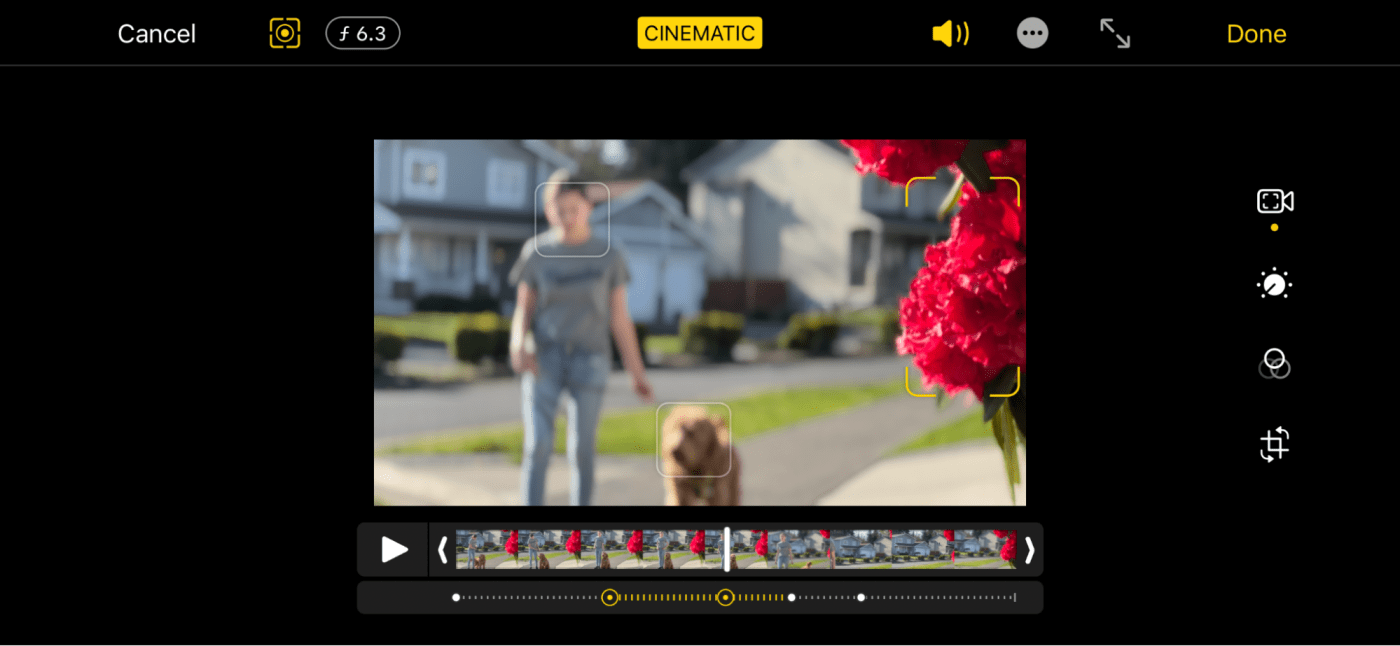
Adjust aperture
If adjusting focus in post wasn’t cool enough, how about adjusting the aperture?
The lower the f-stop, the blurrier the out-of-focus areas on the image are. This region is known as the “bokeh” of the image.
By increasing the blurriness of the bokeh, you draw more attention to the main subject in focus.
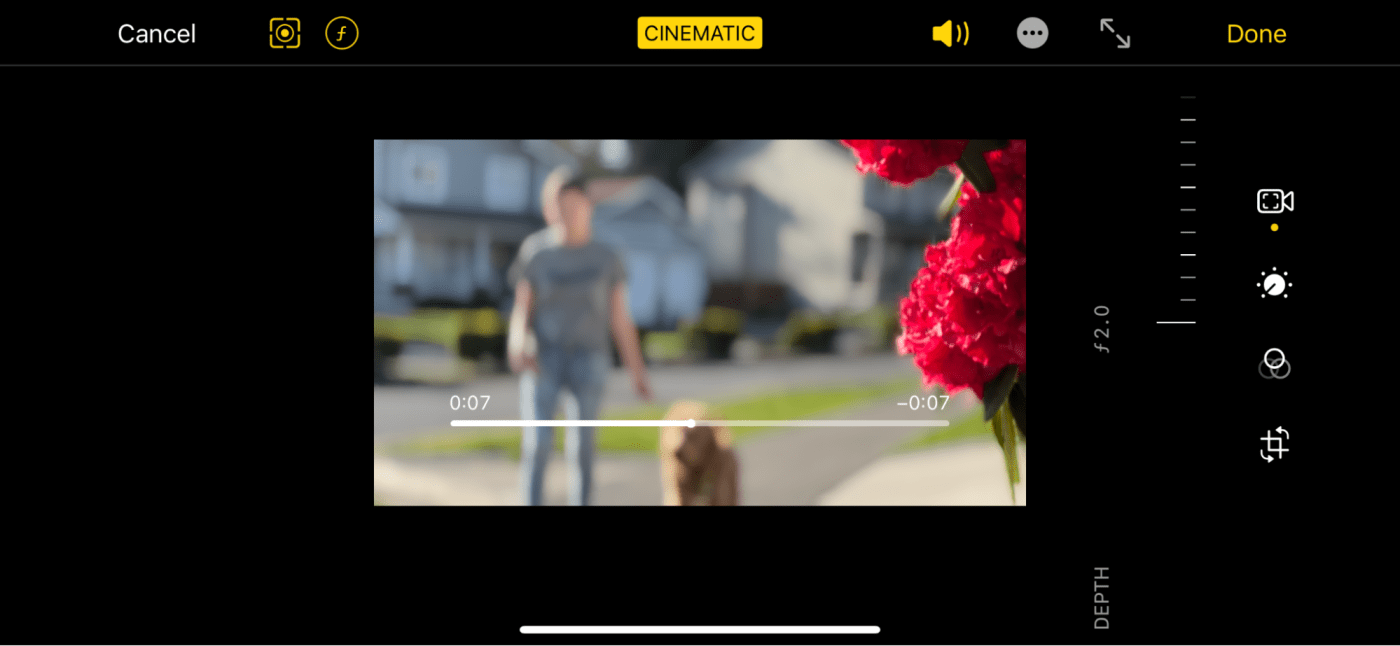
But thanks to computational imaging wizardry, the iPhone is able to break the long-established rules of photography. In a normal camera, the image will brighten or darken as you adjust the aperture of its physical lens. But the iPhone is able to maintain the exposure or brightness level of an image even while adjusting depth of field.
The iPhone interface calls depth of field “Depth." It will not affect your exposure, only the amount of the picture in focus and the level of blur. The ability to affect depth-of-field independent from exposure is a fantastic feature. It's something can replicate with a normal camera, but it requires the use of a physical filter, known as a Neutral Density (ND) filter, attached to the lens of a camera.
Autofocus tracking lock in post
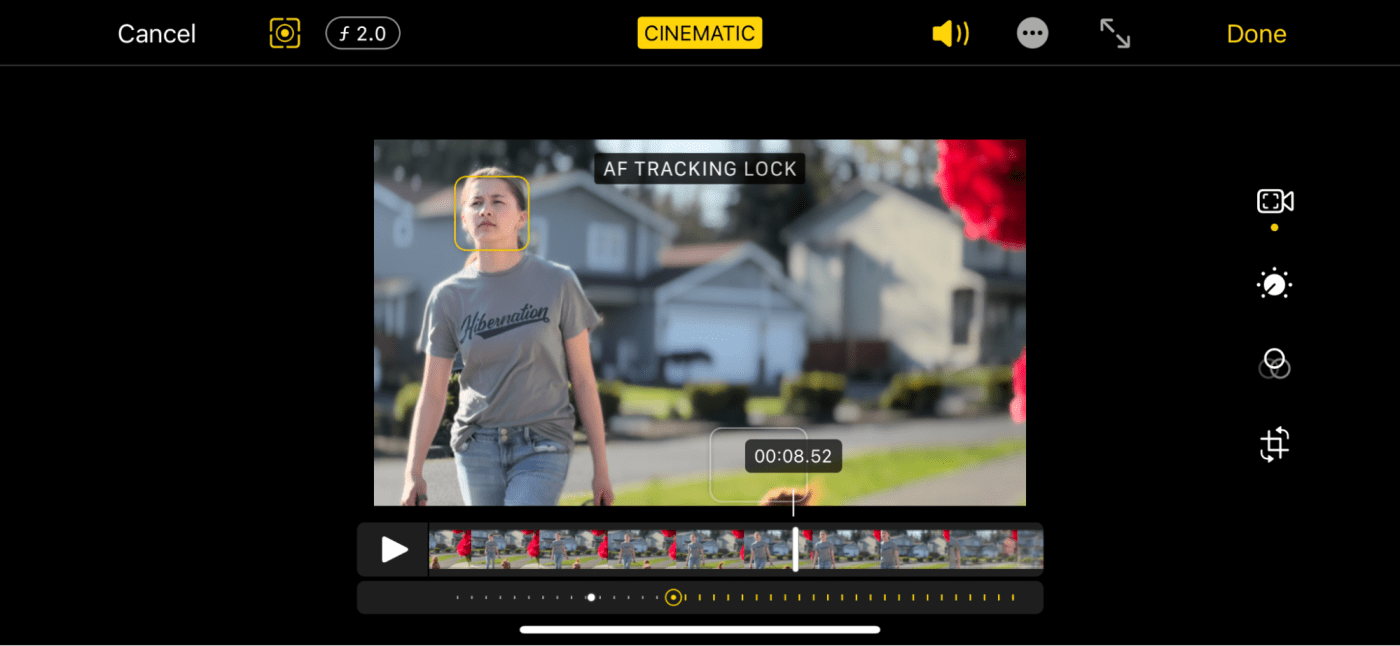
Shifting the point of focus is great, but when you shoot video, subjects move. And what if you forgot to tap an auto-focus target while shooting with your iPhone?
Well, Cinematic footage shot with the iPhone allows for auto-focus tracking lock to be set and changed in post.
I tapped the image of my daughter in the video, and then the iPhone followed her and kept her in focus. Honestly, it's just crazy that we can do this after the fact.
Now that we’ve seen how to adjust focus, aperture, and autofocus tracking on the iPhone itself, let’s look at how to do these things within Final Cut Pro on the Mac.
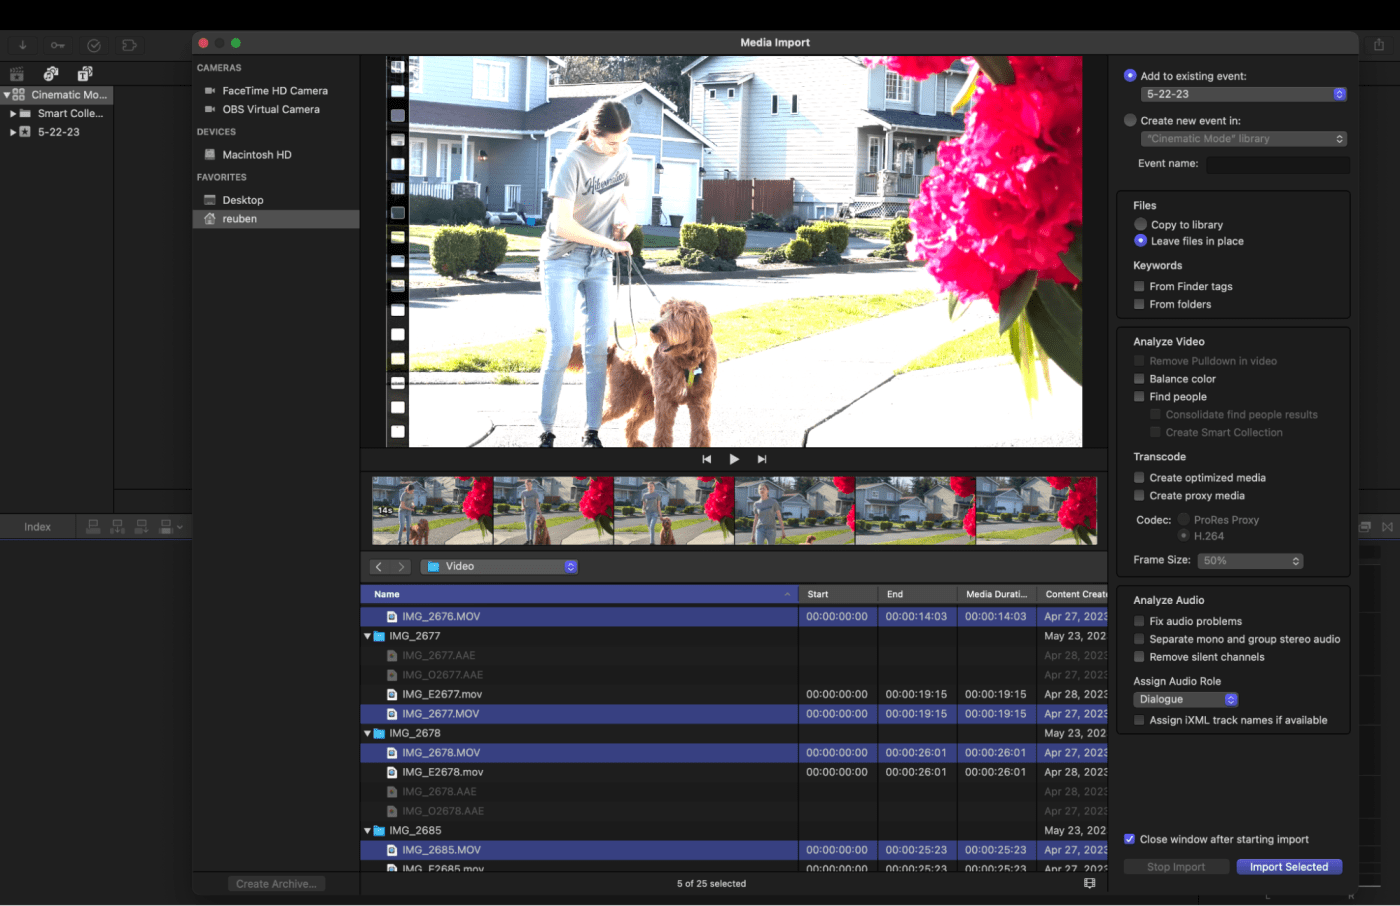
Import to Final Cut Pro
An important note here at the top: If you use iCloud to sync your videos, you cannot use the media tab to import your media. It will import a regular .mov, instead of the video clip with the focus data.
So you need to use the following AirDrop workflow from Apple to ensure that you're importing Cinematic mode footage:
You can use AirDrop to transfer Cinematic mode video clips from your iPhone to your Mac.
In Photos on your iPhone, open a Cinematic clip, then tap the Share button
Tap Options at the top of the screen.

Turn on All Photos Data, then tap Done.
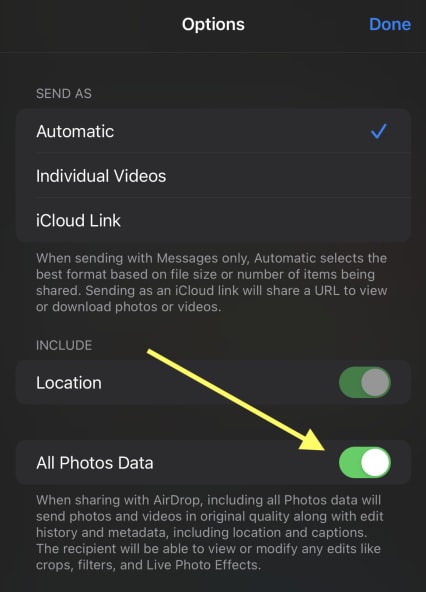
Tap AirDrop, then, in the Devices list, tap the Mac you want to transfer the clip to. (Make sure the Mac you’re sharing with has AirDrop turned on.)
For each Cinematic clip that you transfer using AirDrop, a folder containing four files appears on the receiving Mac.
- In the folder, locate the MOV file that does not begin with “IMG_E,” then import it into Final Cut Pro.
You can import this into the library, but a better practice is to store your media on a fast external drive like the OWC Envoy Pro FX.
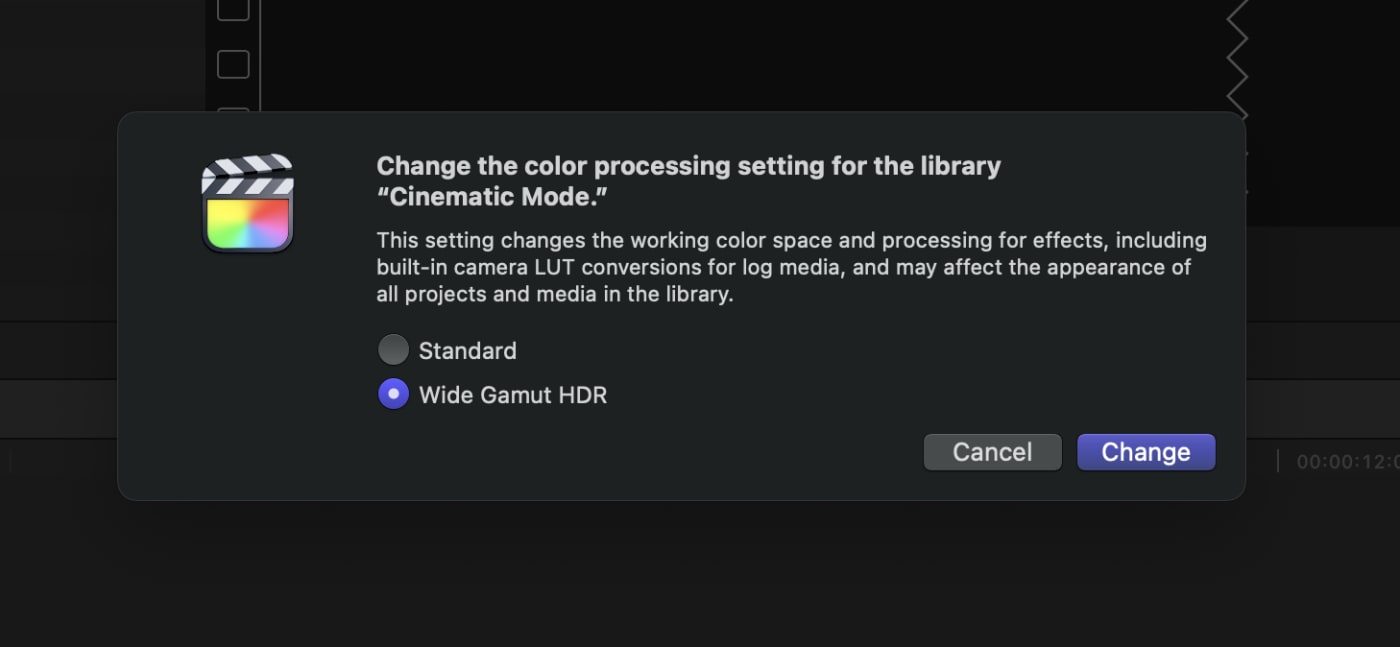
HDR
The iPhone 14 Pro Max shoots HDR video by default, which includes footage shot in Cinematic mode. The following instructions apply to FCP 10.6.5 and earlier.
FCP 10.6.6 (released 5/23/23) automatically conforms the HDR color. So if you are working on a Mac that is compatible with HDR, you can set your library’s color processing to “Wide Gamut HDR.” Use File > Library Properties > Modify to get there.
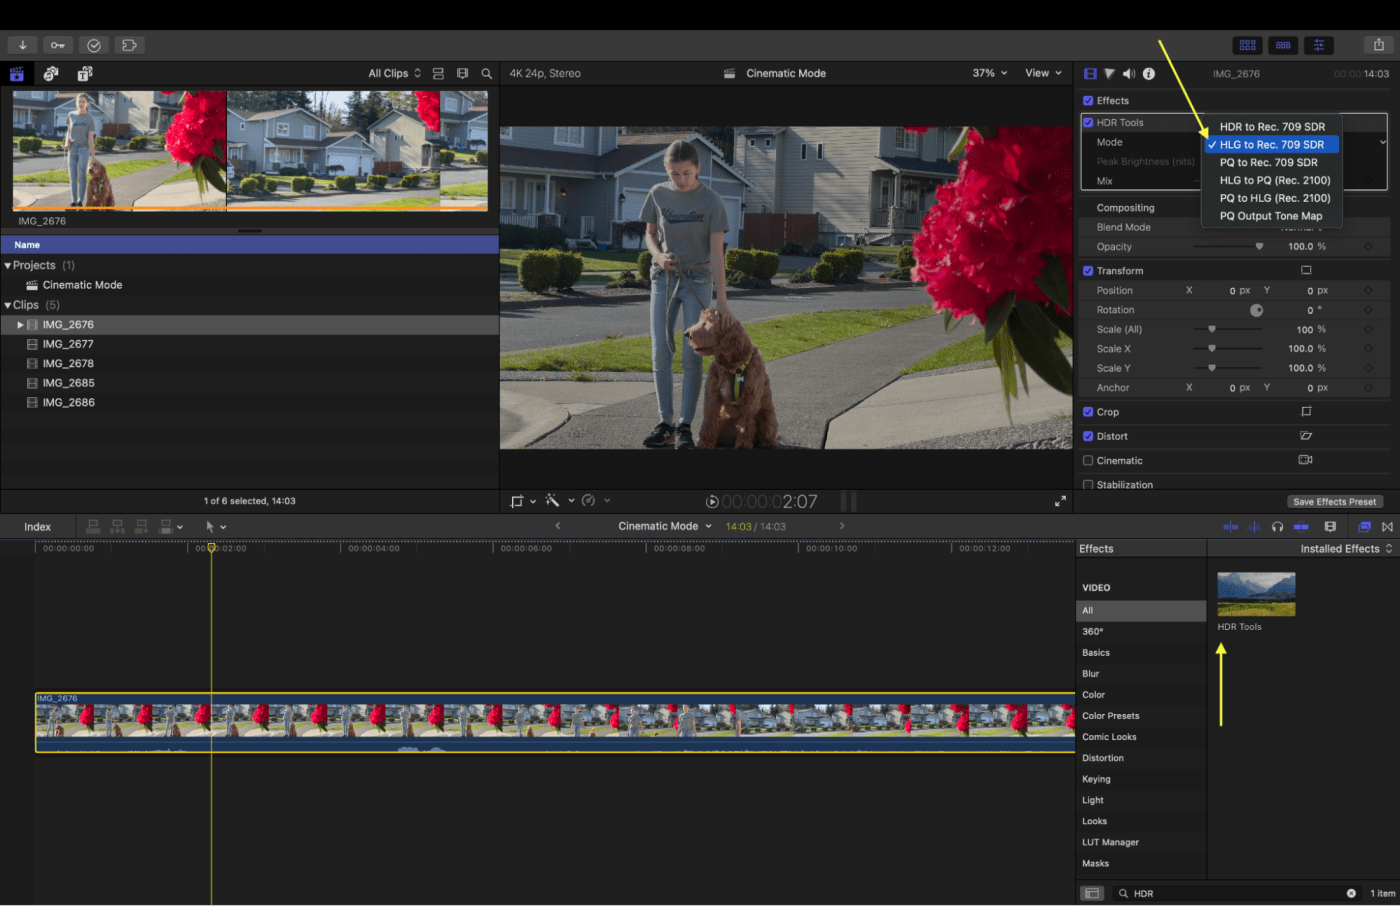
If your display does not support HDR, you’ll want to apply the HDR tools filter to your clips.
Create a new project with Command-N, and drop a clip into it. Next, you’ll want to select your clip in the timeline and apply the HDR tools filter from the filter pane.
This will allow your Mac to display the image with the proper tone mapping. When you initially drop the video in, it may appear over-exposed (as in the image above).
Apply the HDR Tools filter and set it to HLG to Rec. 709 SDR. Now your image should look “normal.”
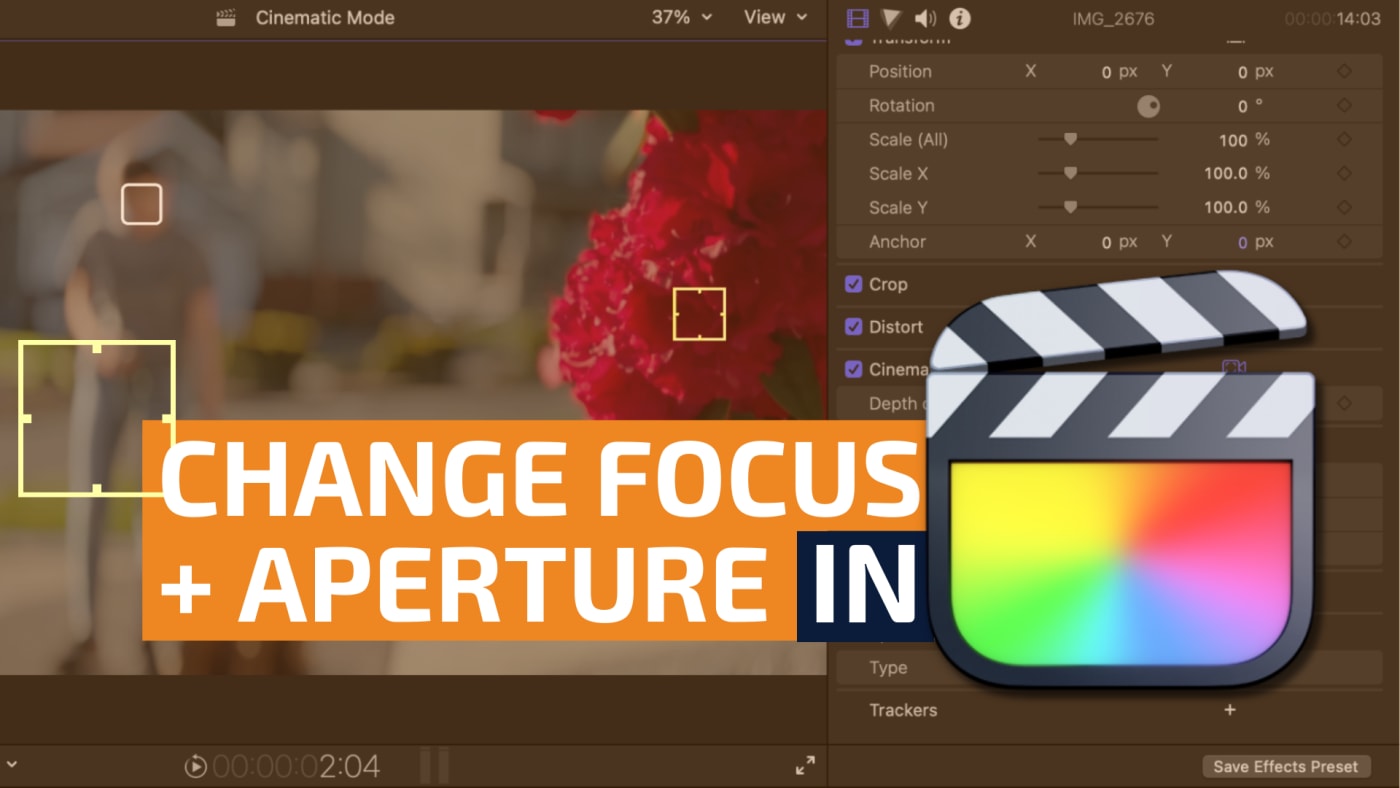
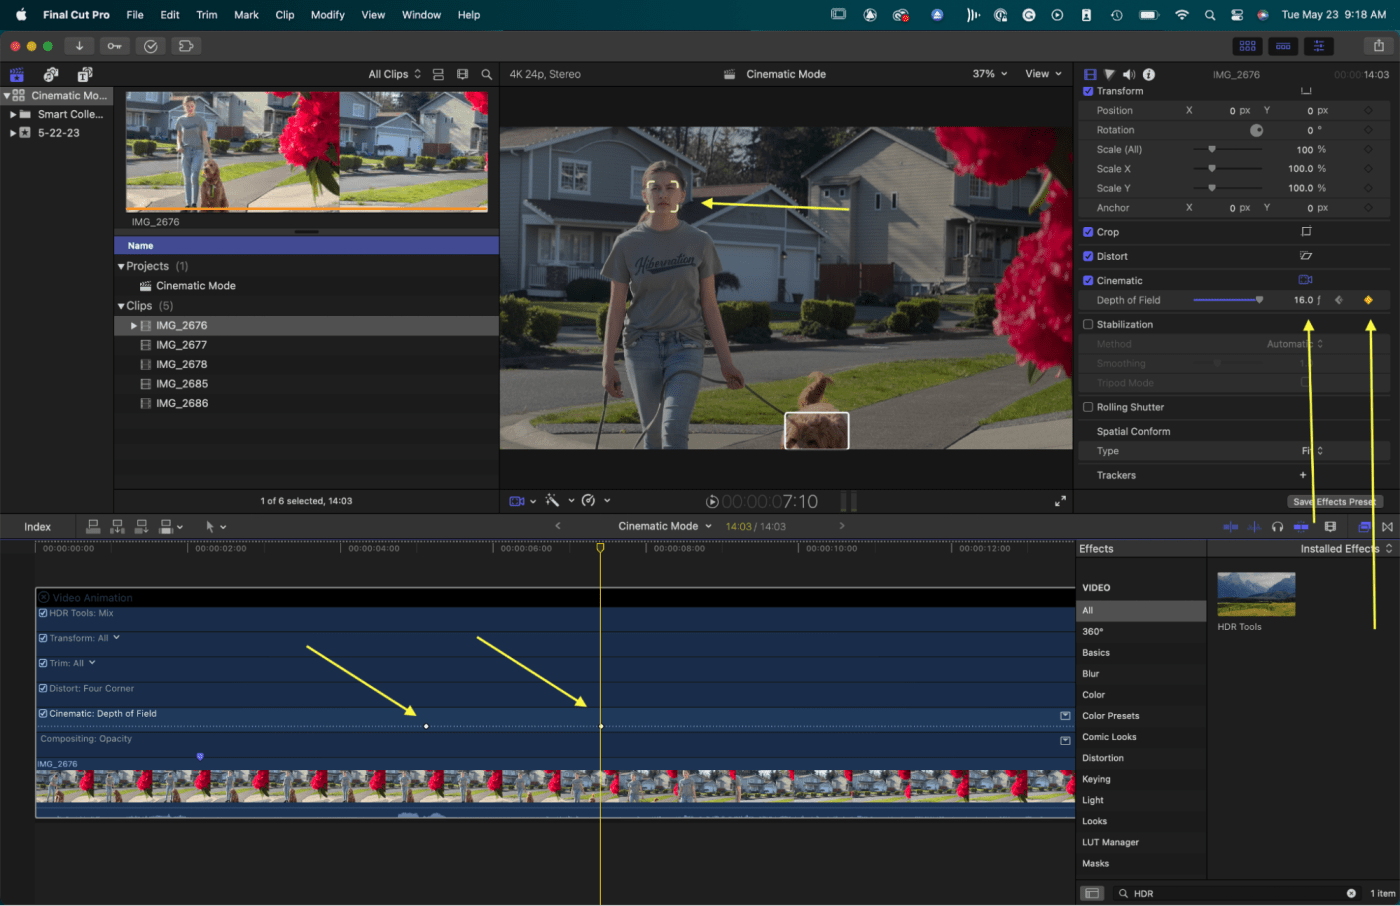
How to adjust focus and aperture of Cinematic iPhone footage in FCP
To get started with adjusting aperture and focus in post with FCP, right-click on the image in the viewer and select “Cinematic.”
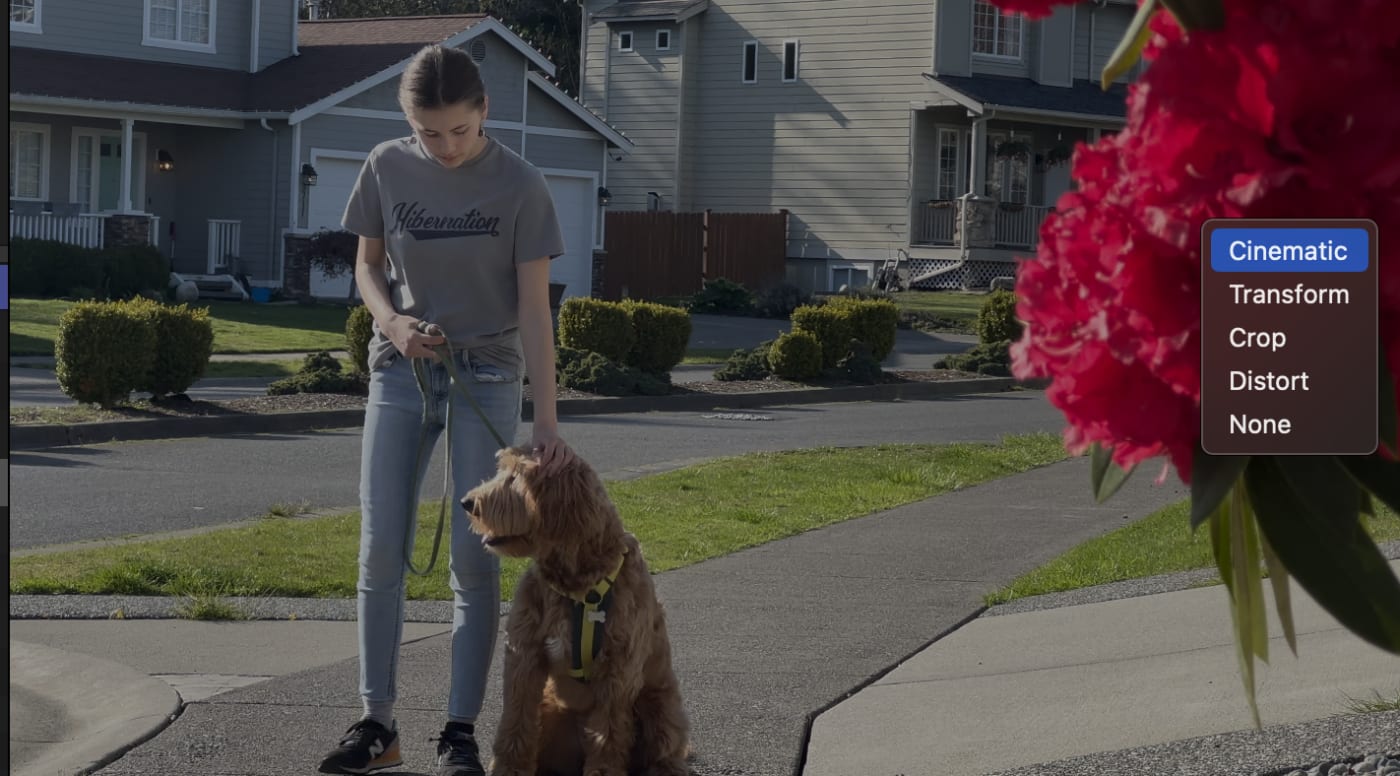
This will reveal several controls. In the bottom left of the viewer, you’ll see a control for enabling the cinematic controls, and you’ll see a “Cinematic” option in the inspector. You can also tap in the viewer to adjust your focus point.
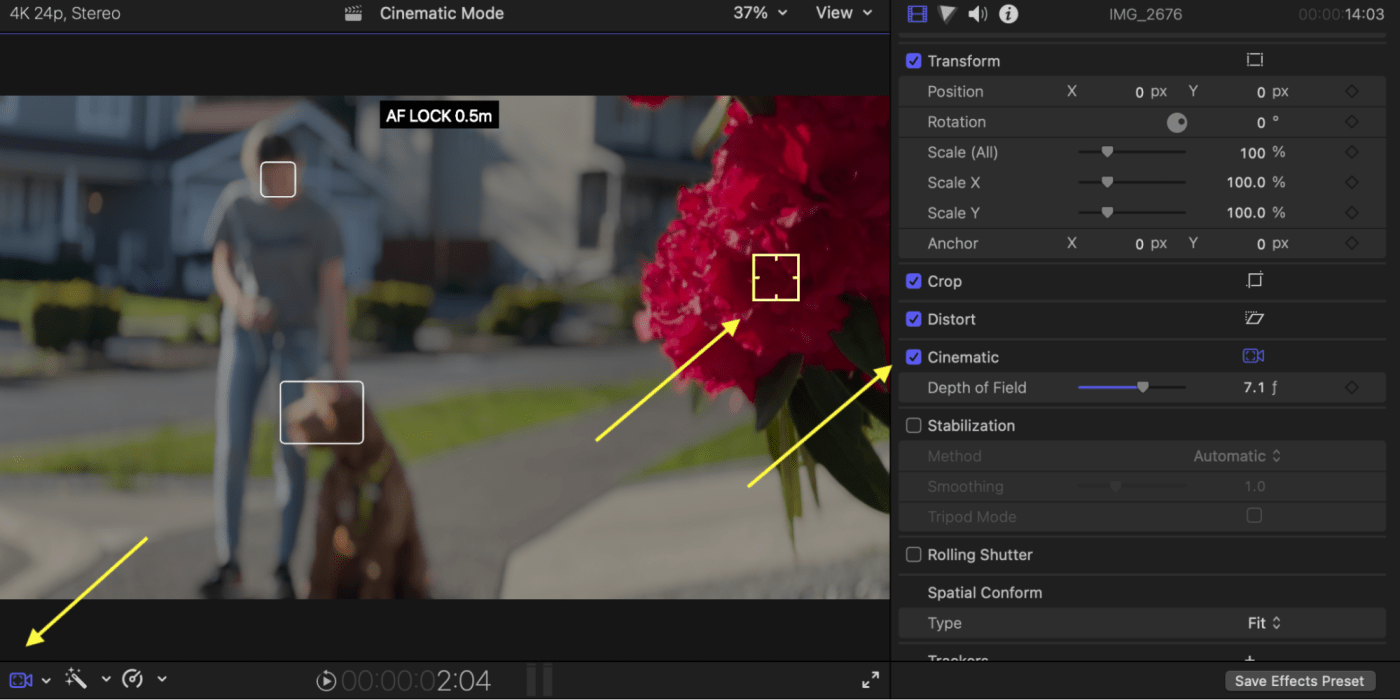
In this case, I have tapped on the flower in the foreground. FCP tells me that it is .5 meters from the phone, and it locks in the auto-focus.
Adjusting depth of field
Things get a little crazy when you realize you can now adjust the depth of field on your desktop.
This is the equivalent of simultaneously opening up your aperture and adjusting a variable ND to compensate. I have adjusted the aperture to f/2.0, and you can see that the bokeh is much blurrier. However, it doesn’t affect the exposure.

Rack focus and depth of field in FCP
Adjusting the depth of field without changing the exposure may be cool. But what is even crazier is that you can use keyframes to rack the focus and aperture simultaneously!
To do so, select your clip in the timeline and press Control-V to open up the Video Animation menu, and notice the “Cinematic: Depth of Field” parameter.
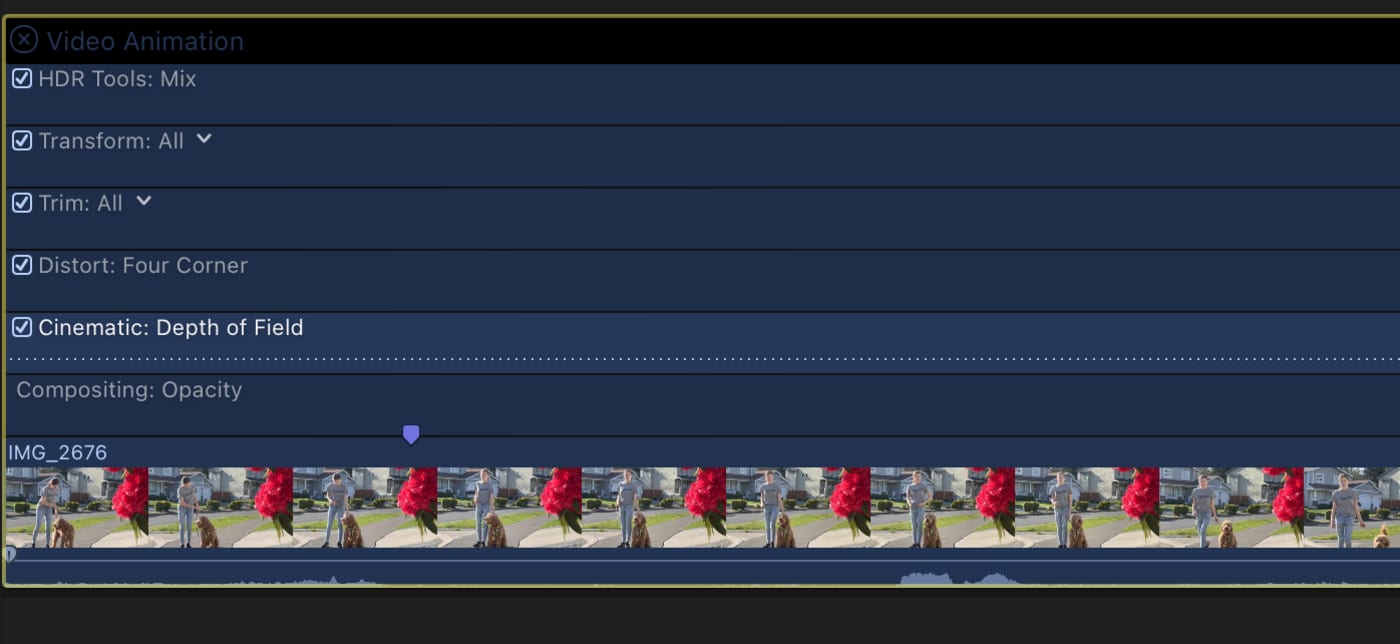
You can now navigate to points along your clip and set keyframes (far right arrow) that will appear as diamonds on the clip’s animation menu. Those keyframes can track changes in the focus point and depth of field.
So in the clip below, we have effectively keyframed what would be three physical axes of focus, iris (aperture), and exposure (by turning a variable ND filter to offset the exposure shift by opening up the aperture on the lens).
Even though in post we are only affecting two axes, focus, and aperture. I know this explanation is a bit complicated, but it is pretty incredible that everything is coming together in just a couple of clicks in the edit.
A peek into the future
This is, without a doubt, the future of cinematography. It's still early days, obviously, but the possibilities this type of post-production editing capability adds are powerful and obvious.
The ability to use depth data gathered during shooting to manipulate focus and depth of field is as significant as RAW codecs’ ability to adjust exposure and color in post. We can look forward to a time when blown takes from missed focus will be a thing of the past.
Cinema cameras, combined with an experienced 1st AC pulling focus have plenty of advantages over an iPhone today. However, with this kind of technology, we are going to continue to see those advantages narrow. And when it comes to lenses, we aren’t far from that bokeh being able to take on whatever lens characteristics you want to assign it in post. It’s going to be exciting to see what filmmakers are able to do with this technology in the coming days.